My garden is out of control.
New Hampshire gardens are like a roller coaster. They creep along for all of June and most of July and then you wake up one morning and everything is ready and you have no place-in your body, fridge, cellar, or freezer-to store it. So what do you do? Collect it and can it.
If you don't already own the food processing bible (not like food processor, but as in extending its shelf life), Putting Food By**, by three extremely intelligent old biddies, Janet, Ruth, and Beatrice... go buy it. I mean at this very moment. Any version is good. Mine is taped together and is a 70's edition.
Anyways, this book is a self-help book for the bumper-crop gardener. Everything is at your fingertips: from canning to freezing to drying to root cellar storage, all complete with scientific explanations. My favorites are the bread and butter pickles, dilly beans, pickled carrots, and homemade salsa.
Soft pickles kinda blow. They are almost always slimy and dissolved under the tongue. These three pickle suggestions will be crunchy. Promise. And most importantly, pickling really isn't hard. It feels more like a craft project with delicious benefits. It's a great project to do with friends.
**for these recipes, you really should read about canning in Putting Food By. It's explains in detail why canning is both a pain in the ass, the reasons for it being so, and why its worth it.
Pickled Carrots
makes approximately 6 pints
4 pounds of fresh, washed, preferably young carrots, quartered lengthwise (or beans if doing dillies)
6 cloves garlic
3 jalapeños or other hot peper of your choice, quartered length-wise
6 teaspoons non-iodized salt (pickling, kosher, or sea)
6 tablespoons sugar
2 cups water
2 cups white vinegar
optional additions:
coriander seeds
peppercorns
mustard seeds
cumin seeds
raw yellow onion
flowers from dill plants
Set up a pot of boiling water that can fit all six jars standing up. Put a steamer basket or use a canning pot. Sterilize the jars with boiling water for 15 minutes.
Bring the vinegar and water to a boil in a different pot over medium heat.
Wash and scrub the carrots. If they are young, they have thin skin and do not need to be peeled. If they are big conventional-sized ones they should be peeled or the final product will taste a little woody-dirty.
cut one carrot the the exact length of the canning jar, minus 3/4 of an inch. Use this carrot to trim all the carrots the the same length. Some you will be able to get two lengths from. Quarter these the long way. On a clean towel, lay the sterilized jars flat on their sides and begin stacking the carrots in the jars. Include one quarter of pepper in each jar. Once they are as full as they can be on their side, turn them right side up and try to fit in a few more carrot sticks. Really wedge them in there!
Next, line up the jars. In each jar put 1 teaspoon of salt and 1 tablespoon of sugar in each jar. Poke one garlic clove in each jar as well. add a quarter teaspoon of any of the spices listed above, or a dill flower, or a sliver of onion. Top each jar with the boiling vinegar mixture to 3/4" from the top. Tap the jar gently on the table top. Wipe the rims with a clean paper towel. Top with clean *NEW* mason jar lids (the bands can be used but the lids always have to be new) and bands, and do not fully tighten... they need a little room to expand!
Then, place them in the canning pot and lower them down (they will displace some water so get ready) and be sure the tops of the jars are covered with water (even just barely). Process in boiling water for 15 minutes (don't start timing til the water is actually boiling). After 15 minutes, removed the jars carefully and let them cool on the counter.
Variations on the carrots include beets, dilly beans, mixed vegetables (cauliflower, radish, fennel, zucchini), and pickled beets. For dilly beans, be sure to include a dill flower/head. Stack them and process them the same as carrots. When they are finished, they should look something like this:
If you love sweet and crunchy bread and butter chips, this following recipe works like a charm. When buying pickling cukes, buy the smallest ones you can find. They always lend to crunchier results.
Bread and Butter Pickles
makes approximately 6 pints
6 pounds of small pickling cucumbers, 1/4 inch slices
1 large onion, sliced
6 cloves of garlic, sliced
3 cups sugar
4 cups white vinegar
2 tablespoons mustard seed
1 teaspoon turmeric
12 peppercorns
chilis (fresh or dried, to taste)
1/2 non-iodized salt
2 trays ice cubes
Set up a canning pot that fits all jars. sterilized them in boiling water for 15 minutes.
In a large bowl combine cukes, onions, salt, and ice cubes. Toss everything together and cover with a towel. Let rest for 3 hours.
After 3 hours, rinse the cukes thoroughly in cold water, changing the water a few times. lay out on a towel to dry.
Combine the rest of the ingredients into a pot and heat to boiling over medium heat. When boiling, add the cukes and onions to the brine, stir, and return to a boil and cook 5 minutes *BOILING*. In the mean time, line up your sterilized jars and *NEW* lids. Using a canning funnel (this keeps the rims clean, if you don't have one you'll have to wipe with a damp paper towel), fill the jars with the cukes, pulling with a ladle from the bottom of the pot where the spices are sitting. Use a clean spoon or butter knife to pack them in, 3/4" from the top, topped with brine. Wipe the rims, tap the jar gently on the table to remove bubbles, and top with lids and bands. Again, don't fully tighten the lids. Load into the canning pot, covered in water, and process for 10 minutes, *BOILING*.
They should look like this:
Homemade Salsa
makes approximately 4-6 pints
8 large garden tomatoes
2 onions
6 cloves garlic
6 assorted peppers (jalapeños, anaheim, poblano, the more variety the better)
a bunch of cilantro
salt
cider vinegar
lime, optional
Sterilize 4-6 jars in a boiling water bath for 15 minutes.
You can make this mix into a smokey salsa or a fresh one. For smokey, quickly grill the peppers, onions, and garlic over a wood fire, in their entirety. That's right, leave the skin on and keep 'em whole. This imparts a bit of smoke flavor but keeps the crispness of fresh veggies. Not more than five minutes.
Cut the tomatoes in half, horizontally, and gently squeeze the seeds out. Don't be picky, not a big deal. What falls out falls out. Rough chop the tomatoes to your liking. Peel the onion and garlic, seed or deseed the chilis.... up to you. Take everything but the tomatoes and grind in the food processor til finely chopped. Put this mix and the tomatoes in a bowl. Figure out how many quarts you have by measuring this mixture as you transfer it to a large pot. For each quart, add 1 teaspoon salt, and two tablespoons cider vinegar to the pot of salsa. Add the lime (really, however much you want) at this point, too. Bring the mixture to a boil.
Once boiled, fill the jars, again, ladling from the bottom. fill within 3/4" from the top. Just like before, clean lids, bands, not too tight. Process for 20 minutes in *BOILING* water bath.
For all canned items, plan to leave them alone for at least a week. It develops better flavor. They should keep for up to a year. There is nothing better than cracking one of these jars open in the dead of winter. Delicious!
HAPPY CANNING!
Leave it Alone
balancing love and neglect in the kitchen
Thursday, September 5, 2013
Monday, March 4, 2013
Granola: The Crunchiest Crunch
I love crunchy foods. Probably almost all that exist, except bones. And maybe shells.
In my case, it's inherited from both sides of the family, and amplified in my sister and I. Mom loves crunchy sweets, fruits, and veggies. Anything crisp and juicy, and if not juicy, something that can be swallowed with a hot cup of tea. I love all those things. Dad loves anything crunchy, salty, and fatty, preferably with beer or coffee (chips and bacon, respectively). In fact, with beer, his ability to eat this type of food goes through the roof. My affinity for these foods trumps my parents, probably due to gene amplification. I digress.
My friends recently shared this NPR interview about some of my most favorite crunchy snacks. Wanh-waaaaaanh. These treats being compared to "fillings sloshing around in my mouth" left me wanting to contribute something crunchy to the world. Something that satisfied all the sweet, salty, toasty moments but tasted better than fillings. Granola.
I grew up with the stuff. If it wasn't in my cereal bowl it was in the bowl of some old hippies in the general vicinity. I remember how exhausted my jaw would get from chewing granola, not able to believe such a small bowl would be so much work. Oh, but the toast oats and nuts, the sweet and salty, was every kids dream, as it near satisfied the junk food craving, or at least did for someone who never ate it. Little did I know my parents had me in crunch training, feeding what they new was an irresistible crunch-lover in the making.
In any case, granola is expensive to buy and ridiculously easy to make. It takes minutes to throw together, can be almost forgotten in the oven, and best of all, its totally forgiving. You can always substitute and change the recipe and nearly be out of necessary ingredients and it turns out great. This recipe is a double batch. There are a lot of optional pieces, not to make it confusing, but to show off that just about anything will do. The egg white addition is courtesy of my friend Kristen (also a crunch-lover) and the flax addition is my vegan slumping-substitute.
Granola
Base:
8 cups rolled organic oats
2/3 cup oil (flax, walnut, almond, sunflower, melted coconut, melted butter, anything will do)
2/3 to 1 cup sweetener (honey, maple syrup, brown sugar, pureed dates are my fave), to taste
1 1/2 tsp salt
Mix all the liquid together, then add the oats and salt. Incorporate by rubbing oats together with you fingers, between your hands, so as to coat all the oats with the wet ingredients. This is the base of the granola.
In mine, I add the following before I bake it (remember, totally optional):
1 tsp cinnamon
1 tsp vanilla
2 whipped egg whites, sloppily folded in (this makes great clusters)
And some other flavorings are yummy, too:
grated ginger
nutmeg
cardamon
cloves
almond extract
or any other thing you can think of.....
And then I lay it on two sheet pans with parchment and bake it at 325 for 30 minutes.
At this point you can take it out of the oven and lazily stir in the following if you want:
1 cup shredded coconut
1 cup nuts or seeds (any kind you like, or all kinds if you like!)
1/4 c ground flax (sprinkle it over the top, then sprinkle with 2 tbls of water) for vegan healthy clumps
a light drizzle of sweetener (if you want sweet sugary clumps)
*Note: if you are going to add fruit, its nest to add it just a few minutes before the granola is done. Other wise it becomes a jaw breaker.
And then throw it back in the oven for 30-40 more minutes. Some parts might be a bit browner than others, but just take it out and let it sit on the counter top to cool on the tray.
Once cool to the touch, store it in a big airtight container. It'll store for way longer than you'll let it last.
Monday, January 28, 2013
Poof! Magic Sauce
Sometimes I am fascinated with how quickly food is transformed from its entirety to something unidentifiable. What I love is when you can taste all the wholes that went into a concoction, no matter how deformed, or reformed (I'm an optimist) it becomes. In my travels, both nationally and internationally, I've noticed every place has a sauce. One unique to the location: super versatile in flavor, put on everything, so robust, and there you are left with an overwhelming feeling of "daaaaaaanng," for lack better words. The best ones of these sauces I've had are quite simple to make. Its a little bit of a few things, squished together or blended, with some salt. And, although the taste is something totally new and exciting, you can distinguish the flavors of the once whole parts.
Some of my most memorable of these sauces are so sharp in my mind. In the Andes, there's this sauces that ranges from yellow to green, kind of creamy, super sharp with floral spicy yellow peppers, garlic, sometimes peanuts, sometimes milk, and always full of wild mountain herbs. It tastes like all of these things individually, but it also tastes like the Andes, or at least the rural parts and all their aromatic splendor. Whether you eat it on choclo, cold potatoes, or anticucho, its amazing and its everywhere. In southern france I ate aioli on a lot of things: bouillabaisse, french fries, sandwiches. The ones made with olive oil were so rich, and yet you could taste the egg, fresh oil, garlic, and lemon. That too tasted something like the landscape. I hate mayonaise, but I absolutely loved that. And the Virgin Islands! Where every roadside stand has gatorade bottles full of vinegar with a hole poked in the top, stocked with whole scotch bonnet peppers, garlic, and wild oregano and thyme. Three drops on your pattie (pa-té as its pronounced) or goat curry is almost too much, and yet, the individual flavors permeate the entire plate and there's an instant party in your mouth. And of course, every taqueria has a salsa that's perfect, even if it's different every time. Or that fish sauce concoction you put on Vietnamese noodles. Or even good ol' french onion dip. There, I said it.
My friend Kate taught me one of these recipes. The other one is a bastardized veggie pate I had one when I was twenty. There's a million other sauces I would add here, but maybe they'll come later. Basically, these two are fantastic as condiments for many things (veggies, bread, sandwiches, one's good for tacos, etc). They both have a fairly similar treatment, where you stick everything in the food processor or poke it with the immersion blender and its done. I'll include some variations, too, as nothing is every repeated indentically in my kitchen.
Winter Pate (Mushroom, Beet, or Savory)
2 cups chopped assorted mushrooms or 1 grated beet or 1 stalk of celery, chopped
1/4 c olive oil
1 grated carrot
1/2 onion, chopped
1 clove garlic, crushed
1/2 c wine, optional
1/2 c cashews, walnuts, or pecans
soaked in hot water
juice of half a lemon
salt and pepper to taste (more than you think)
2 tablespoons fresh herbs (parsley, thyme, rosemary, sage, or whatever is laying around), optional
*** for beets and celery option
First, pour some boiling water over the cashews to cover them. They can soak while you do everything else. Next, rough chop the mushrooms, and put them in a hot (medium high) DRY pan. Now walk away. Don't touch the mushrooms for 7-10 minutes. You can get your other ingredients ready now. After 7 minutes you can check to see if they are toasting by picking up one piece of mushroom and looking for browning. If its not there, don't touch the rest. Give the 3 more minutes. After that, right about when they begin to show a bit of smoke, stir them up. They will have lost a lot of volume and sound like you are stirring rubber bands. Stir them for a minute, then scrape them to one half of the pan and add the oil, carrots, garlic, onion, and herbs to the other half. Now, if you don't have mushrooms, and you opten for beet or celery, you ***START HERE (everything in the pan at once). Just let them sit undisturbed for five minutes. This will develop some caramelization on the bottom while you find some old wine. Stir the veggies again, this time incorporating the mushrooms, until everything is soft and browned. Next, throw in the wine, which will quickly evaporate, or don't, your preference. Put everything form the pan into a food processor bowl or immersion blender vessel (I use a mason jar). Add the cashews, lemon, salt, pepper, and 3 tablespoons of water and whizz it till its smooth. I let mine go for a few minutes to whip in a little air. Scrape it down once.
Voila! Where'd everything go? Don't worry, its all there. So savory, warming, and rich. Oooo-wee!
Summer Sauce
4 juicy lemons or limes, squeezed
1 bunch cilantro, chopped
1/4 onion or 2 scallions
1 clove garlic
1 tablespoons olive oil
1/2 c cashews, pumpkin seeds, or sunflower seeds, soaked in hot water
1 jalapeño, without seeds, optional
salt to taste
This one is so easy. Soak the nuts or seeds before you do anything else. Everything goes in the food processor or the immersion operation (see the jar above). Add a tablespoon or two of water to thin it to the consistency you wish (I do thinner for dip or sauce and a bit thicker for bread). I whip this one too for a super smooth finish. It's an awesome sauce for roasted or grilled veggies or meats and raw ones, too! So versatile. Oh, Baby. What a transformation!
Monday, January 21, 2013
Better is Forgetting
I am still reflecting on 2012. It always seems that January and February are full of extra alone time and contemplative, lamenting, even grumpy glances from every direction. It is filled with the freshness of the new year, of course, but especially for a New Englander like myself, there's a lot of feelings fermenting and changing about time's passing. We're just programmed to do this in the winter. The feelings come in different forms, all too familiar. I guess it's kinda like sauerkraut. A love hate relationship. Mostly love, and a little bit of hatred for loving it so much.
Recently, I found an article about 10 food trends for 2013. The piece should have been called "Forgotten Foods" or "How to Make the Most of it" or "Making Good Food Last" or better yet "Trends of Yore for 2013: Other Cultures do it Better." Besides the California soft-serve, I walked away from the article saying, "Duh," and immediately bought ingredients from the store to make sauerkraut.
Sauerkraut is everywhere. Ya know why? It's smart. It stores forever, its raw, and its full of vitamins. All the bad stuff is gone but the good stuff remains: the hard to digest sugars have been taken care of by the bacteria doing the fermenting, and the crunch crisp flavors stay, with the added bonus of some gut-loving bacteria that make your body function better than normal, not to mention some damn good flavor.
Hard to convince people to love sauerkraut. I'll start with some stories.
El Salvador. Never been there. I can only imagine its amazingness through the hundreds of pupusas I've consumed in the Bay. Walk into a authentic pupuseria and you are deep in a sleeping bag of chicharron, sweet plantains, and masa. Somewhere between literally and figuratively. And just like the cold breeze you get across your little face when camping, is the smell of something fresh and acidic, with a pinch of oregano and a wisp of fresh chile. If you don't smell it you are in the wrong place. Curtido is fermented cabbage to cut the delicious grease of meat and cheese and it is my favorite. I like to think that the warmth of the pupusa griddle and El Salvador itself speeds up the fermentation of the dish, and then more stuff just keeps getting added and added forever.
The same goes for Korea and Kimchi. Rich, salty, savory, super fatty flavors sliced with the crisp and spicy pickled Napa cabbage saturated in fresh pungencies. Nothing cuts pork fat like a tart, fresh, vegetable, full of flavor. A lot of cultures would agree with that. Sausages and kraut. I heard that in Korea and other countries, the most fermented treats come out for the most special occasions. I once heard a story about tofu packed in a crock and buried in the ground, only to be uncovered on a wedding day.... but that's another story.
And you'll find fermented cabbage in hundreds of iterations all over the globe. There is a reason for it. If I haven't convinced you yet, read this article about the benefits of fermentation, trying to ignore the characature photo on the left.
Now, if only we could get a little creative and move away from the jar or even baggie of while, soggy, salt-laden sauerkraut at the store.....
Here's my version of simple sauerkraut. Of course, I always add exciting things to make it, well, more exciting. Variations will follow.
Sauerkraut
5 pounds cabbage, white or purple
1 1/2 tablespoons coarse sea salt or 2 tablespoons kosher salt
1 tablespoon whey, drained from yogurt, OPTIONAL
When you remember it exists, it's time start crushing it up by squeezing. Alternate crunching and squeezing with you hands and tossing. After 5 minutes, you'll notice the cabbage feels wet. If you want to make other additions, now would be the time.
In a super clean 1/2 gallon Mason jar, begin to pack the kraut. One handful at a time, pack the kraut tightly in the bottom of jar. Use your fist to press firmly after each additional handful. By the time its all in the jar, there will be a bit of liquid on top. This is what it is suposed to look like. You can also do two
Now for the weight. Sauerkraut is anaerobically fermented. That means that for the buggies to grow in a healthy way, it has to happen without oxygen. It is for this reason your cabbage has to be submerged under it's own juice. I find the perfect helper is a 22 ounce beer bottle. Try to find one with a flat bottom, so no air bubbles get trapped. Clean it really well. Make sure the rim of the jar is wiped clean from kraut pieces. Fill the beer bottle with water, cap it, and fit it inside the rim of the ball jar, on top of the cabbage. But the whole jar-bottle-apparatus to sit in a bowl in a cool darkish place. Cover it with a cloth or towel. Now walk away.
It's safe to say you could now leave this for a week, never looking at it once. Sometimes I peek, sometimes I don't. The pictures here document some of the change you might see over the course of the week. You can let it sit for up to three weeks. My preference is a young kraut,so, one week. Sometimes if you add things that are slightly sweet to the mix, it seems to speed up the process. Worth noting.
After one week its done! Lots of color and flavor change! Ready to be cleaned, capped, and stuck in the fridge. This stuff is good for a long time. Mine never lasts more than a couple months. It is good on everything. Tacos! Fried rice! anything heavy and spicy. Meat. Fish. Cheesy things. Sausage. Beans. Rice. Avocados. Salads. Sandwiches. Eggs and toast. You name it, kraut belongs there.
These variations can be made by just throwing these in the mix!
Curtido:
2 grated carrots
1 bunch chopped scallions or 1/2 onion thinly sliced
1 tablespoon dry oregano
2 sliced jalapeños
Mustardy:
1 tablespoon black or brown mustard seeds
1 bunch chopped scallions
Gingery:
a 2-3" piece of ginger, julienned
1 bunch scallions or a clove of garlic, chopped
Super Spicy:
3-5 jalapeños, or other hot chilis
Caraway:
1 tablespoon caraway seeds
Honestly, the possibilities are endless. You can
add most vegetables and spices to kraut and it will
do its thang. I only caution you to watch it carefully if you add sweets.... beets, onions, carrots, daikon, even hot peppers... they all have a bit of sugar, and so the fermentation seems to be slightly faster in those.
Finally, if your kraut looks weird, smells particularly bad, or has blue and green stuff growing all over it, don't eat it. If you have any question at all, don't risk it. If fermentation and preserving is something you are serious about, I recommend these two bibles: Putting Food By and Wild Fermentation. These really go into the science of preservation and fermentation,
which is quite relevant if you value survival.
Recently, I found an article about 10 food trends for 2013. The piece should have been called "Forgotten Foods" or "How to Make the Most of it" or "Making Good Food Last" or better yet "Trends of Yore for 2013: Other Cultures do it Better." Besides the California soft-serve, I walked away from the article saying, "Duh," and immediately bought ingredients from the store to make sauerkraut.
Sauerkraut is everywhere. Ya know why? It's smart. It stores forever, its raw, and its full of vitamins. All the bad stuff is gone but the good stuff remains: the hard to digest sugars have been taken care of by the bacteria doing the fermenting, and the crunch crisp flavors stay, with the added bonus of some gut-loving bacteria that make your body function better than normal, not to mention some damn good flavor.
Hard to convince people to love sauerkraut. I'll start with some stories.
El Salvador. Never been there. I can only imagine its amazingness through the hundreds of pupusas I've consumed in the Bay. Walk into a authentic pupuseria and you are deep in a sleeping bag of chicharron, sweet plantains, and masa. Somewhere between literally and figuratively. And just like the cold breeze you get across your little face when camping, is the smell of something fresh and acidic, with a pinch of oregano and a wisp of fresh chile. If you don't smell it you are in the wrong place. Curtido is fermented cabbage to cut the delicious grease of meat and cheese and it is my favorite. I like to think that the warmth of the pupusa griddle and El Salvador itself speeds up the fermentation of the dish, and then more stuff just keeps getting added and added forever.
The same goes for Korea and Kimchi. Rich, salty, savory, super fatty flavors sliced with the crisp and spicy pickled Napa cabbage saturated in fresh pungencies. Nothing cuts pork fat like a tart, fresh, vegetable, full of flavor. A lot of cultures would agree with that. Sausages and kraut. I heard that in Korea and other countries, the most fermented treats come out for the most special occasions. I once heard a story about tofu packed in a crock and buried in the ground, only to be uncovered on a wedding day.... but that's another story.
And you'll find fermented cabbage in hundreds of iterations all over the globe. There is a reason for it. If I haven't convinced you yet, read this article about the benefits of fermentation, trying to ignore the characature photo on the left.
Now, if only we could get a little creative and move away from the jar or even baggie of while, soggy, salt-laden sauerkraut at the store.....
Here's my version of simple sauerkraut. Of course, I always add exciting things to make it, well, more exciting. Variations will follow.
Sauerkraut
5 pounds cabbage, white or purple
1 1/2 tablespoons coarse sea salt or 2 tablespoons kosher salt
1 tablespoon whey, drained from yogurt, OPTIONAL
Quarter and core the cabbage(s). Slice the cabbage into thin strips either by hand or with a food processor. Put all the cabbage in a giant bowl and toss with salt. Cover with a towel and let sit for 1-4 hours on the counter. Just forget about it.
In a super clean 1/2 gallon Mason jar, begin to pack the kraut. One handful at a time, pack the kraut tightly in the bottom of jar. Use your fist to press firmly after each additional handful. By the time its all in the jar, there will be a bit of liquid on top. This is what it is suposed to look like. You can also do two
quart-sized jars, especially if you want to make different kinds.
Now for the weight. Sauerkraut is anaerobically fermented. That means that for the buggies to grow in a healthy way, it has to happen without oxygen. It is for this reason your cabbage has to be submerged under it's own juice. I find the perfect helper is a 22 ounce beer bottle. Try to find one with a flat bottom, so no air bubbles get trapped. Clean it really well. Make sure the rim of the jar is wiped clean from kraut pieces. Fill the beer bottle with water, cap it, and fit it inside the rim of the ball jar, on top of the cabbage. But the whole jar-bottle-apparatus to sit in a bowl in a cool darkish place. Cover it with a cloth or towel. Now walk away.
day 1: Ready to be forgotten! |
After one week its done! Lots of color and flavor change! Ready to be cleaned, capped, and stuck in the fridge. This stuff is good for a long time. Mine never lasts more than a couple months. It is good on everything. Tacos! Fried rice! anything heavy and spicy. Meat. Fish. Cheesy things. Sausage. Beans. Rice. Avocados. Salads. Sandwiches. Eggs and toast. You name it, kraut belongs there.
These variations can be made by just throwing these in the mix!
Curtido:
Day 2: Juicy, a couple bubbles, very distinct colors. |
1 bunch chopped scallions or 1/2 onion thinly sliced
1 tablespoon dry oregano
2 sliced jalapeños
Mustardy:
1 tablespoon black or brown mustard seeds
1 bunch chopped scallions
Gingery:
a 2-3" piece of ginger, julienned
1 bunch scallions or a clove of garlic, chopped
Super Spicy:
3-5 jalapeños, or other hot chilis
Caraway:
1 tablespoon caraway seeds
| |
Day 5: Brown Bubbles and stinky! Lots of purple juice |
Day 7: Crusty bubbles and stinky! Uniform color. |
Honestly, the possibilities are endless. You can
add most vegetables and spices to kraut and it will
do its thang. I only caution you to watch it carefully if you add sweets.... beets, onions, carrots, daikon, even hot peppers... they all have a bit of sugar, and so the fermentation seems to be slightly faster in those.
Cleaning the rim |
Finally, if your kraut looks weird, smells particularly bad, or has blue and green stuff growing all over it, don't eat it. If you have any question at all, don't risk it. If fermentation and preserving is something you are serious about, I recommend these two bibles: Putting Food By and Wild Fermentation. These really go into the science of preservation and fermentation,
which is quite relevant if you value survival.
Enjoy the kraut! Fermented foods are the answer to taming the wild-belly beast.
Wednesday, January 9, 2013
2013: Daaang, January, that's fresh!
New Year's Resolution #1: Listen to my friends
After a weekend in the North Woods of Minnesota I am finding myself incredibly grateful for my amazing friends and (real) seasonal food. A quick shout out to my besties: Every time I get together to share food with folks they tell me to write down all my intuition so it can be shared with everyone. So, here's it goes.
To sum up the slacked year and a half: I am in graduate school. The end.
But, I am still cooking, obviously, and like many graduate students, on a budget that is nothing to brag about. But I manage to eat seasonally and locally on that budget. Being in California, it's all relative, but it's good practice for when the time comes to move back East or anywhere but here for that matter.
On a recent trip home to NH, I checked on my parents greenhouse bed expecting to see frozen miniature plants, and lo and behold, I found some delicious leafy kale! What a sight in a landscape devoid of color. Green! Short and shout from the long cold nights and short days, there wasn't much to the plant, but I knew the flavor was perfect. If you don't already know that kale is better after it's been through a frost, consider yourself enlightened. It complete changes the flavor and texture into something quite magical. In fact, you can pack raw kale in the freezer and when you defrost it it's sweeter, still appears to be raw! I learned that one out of laziness, avoiding blanching before freezing.
I took a bunch of it, brought it back to the house, and whipped it up as a replacement for basil in pesto. I added a touch of lemon and zest to brighten it up. Threw some roasted butternut squash on there and suddenly seasons were melding. The hot pasta hit the garlic and lemon and it's summer, and the roasted butternut squash and sweet kale was a strong reminder of the lasting power of hardy crops. It's a nice experience on the shortest days of the year.
The best part about this recipe is it is incredibly fast. If it weren't for the butternut squash, you could make this in the time it takes to boil water and make pasta. It would be perfectly delicious without it. But I love contrast, orange, green, winter, summer. The squash follows my leave-it-alone mentality. Chunk it up and forget about it in the oven. I suppose the hardest part of this recipe is peeling this damn thing. Worth the time, and if you get a big squash, you'll have plenty left over to use in something else. Or you'll find it tastes like candy and you eat most of it before dinner is served. That could also happen.
Winter Pesto
A bunch of kale, destemmed and washed
A cup of nuts or seeds toasted or raw, no salt (pumpkin seeds, pecans, walnuts, almonds, or cashews)
zest and juice of a lemon
2-4 cloves garlic
1/2 c good quality extra virgin olive oil
salt and pepper to taste
A hardy winter squash (butternut, buttercup, or kabocha)
1 pound pasta (a sturdy shape like orecchiette, rigatoni, spaghetti)
Cheese (Reggiano, sharp cheddar, anything aged, nutty, salty) or not
**A note about the garlic: you can use raw or you can roast the cloves a bit in some of the olive oil (for a few minutes in a pan over medium low heat) to take the edge off. Thats up to you.
Start with the squash. Peel it and cut it into 1 or less inch chunks, toss with a drizzle of olive oil on a sheet pan. No seasoning. 400 for 30 to 45. Honestly, forget about it while you do everything else.
For the pasta, bring a big pot of water to a boil with a small handful of salt. That's right, handful. An exact measure would be at least 2 tablespoons. No oil.
While the pasta is boiling, whiz all the other ingredients, sans cheese, in the blender, cuisinart, or just chop finely by hand. The pesto is finished. It's hard for me at this point not to just eat the whole lot spread on bread.
Drain the pasta when its al dente. Don't let it drain too long, keep a bit of moisture on it to steam the kale in the pesto. Throw the pasta and pesto in a bowl and toss to combine.
Take out the squash. Salt and pepper the squash once it's out of the oven. Put it on top of the already tossed pesto and pasta. A dash of cheese, or not. A drizzle of really yummy olive oil, or not. Your preference.
To think that something so fresh could come out of a place with not a speck of green in sight. Where people cut holes in frozen lakes to jump in on the shortest day of the year.
Thursday, June 2, 2011
Peru: Mamas and Papas
Peru is an incredible place. Extreme: unforgettable smells of hot urine, car exhaust, and filth. The locals don't sweat the small stuff... they embrace the soiled city and it's stray dogs, and the poop filled streets, and the nosy tourists, and what they have or don't have. Peruvians are joyous people with serious character, and their food the same: limited resources, colorful composition.
Simple and delicious. Peruvian food really sealed the deal for writing this blog I've been blabbing about for so long. For some time I've entertained the idea of addressing my more recent philosophy of the importance of neglect in fine cooking. Rather than transforming foods into something unrecognizably complicated, I prefer pure ingredients and minimal preparation with little attention to detail. Peruvian mothers agree.
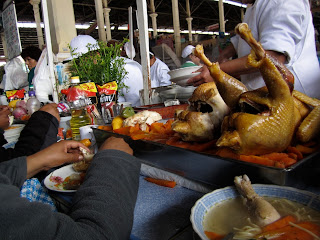
It begins at the Mercado San Pedro in Cusco, Peru. A bustling scene of vendors from six to six everyday, this place is a mad house. Exotic fruits, skinned cow faces, bulls testicles, and libido smoothies made of live frogs. The prepared foods at this place are delicious. And though I'm afraid to admit it to my mom, it is here I had revolutionary chicken soup. For breakfast.
The scene is intense: 7:00 am, twenty vendors, side by side, all serving the same chicken soup out of 100 gallon pots. All of them want you as their customer. There are benches and stools seemingly made for Peruvian children and not for anyone with longer legs. Piles of steaming chickens and vegetables sit in front of each station. And it's packed. Here's the story: many whole chickens, assorted whole vegetables, herbs and salt go into a pot. They hang out in the bath for hours before they're pulled out for display, the veggies get salted and vinegared so the bugs stay away, at which point the second batch of the same ingredients is thrown in the pot. It goes on like this, perhaps, forever.
When you order a soup, the soup lady picks up a big rock and a knife and hammers the knife through the chicken. A fist-sized chunk is put in a bowl, broth ladled over the top, then a couple chunks of carrot. Finished with a pinch of chopped onions and parsley. There is a spicy sauce of raw onions, garlic and hot peppers soaked in vinegar that's optional. You can ask for it with or without spaghetti, and with or without extra vegetables.
What I like most about this soup besides its depth is that everything goes in the pot and comes out looking exactly the same, just cooked. You know what you're eating, and you can taste it all in the broth. Neglect. Dump it in the pot, hack it up and serve it beautifully. The one pot cooking is popular in Peru, and what is in the pot is turned into many dishes: soups, salads, meat dishes all from the same pot. These ladies make escabeche (pickled vegetables), and two soups from the same cauldron. My host mother in Cusco, Aurora, did the same. Potatoes, Camote (sweet potatoes), Yucca, Chicken, onions, carrots, herbs, grains in a pot became fried chicken, potato salads, and hearty soup. The herbs are hard to come by... Huacatay, an herb in all Cusquena cuisine, only grows in the Andes. Sorry, North America. Some things will never be the same.
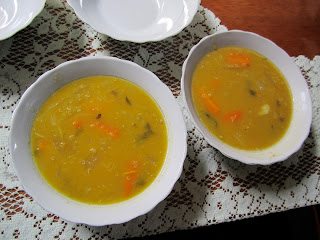
My host mom, Aurora, whipped up these three courses in less than an hour. Quinoa soup, fried chicken, potato salad. The vegetables are served whole. You don't have to cut anything! Genius.
One Pot Meal: Sopa de Quinoa
4 whole chicken legs, skinned
1 onion
2 potatoes
2 sweet potatoes
1 fist size chunk of squash
3 cloves garlic
1 stalk celery
2 inches ginger
1/2 c quinoa
1 tablespoon assorted fresh herbs
5 each black peppercorns and allspice or juniper berries
1 cup peas
Put all ingredients, except the peas, in pot or pressure cooker and cover with water, about 2-3 quarts. Leave the vegetables whole. Cook for at least 45 minutes at a simmer until everything is fork tender. Remove sweet potatoes, chicken, herbs, and squash. scrape the squash, mash, and return to the soup pot. Leave the sweet potatoes to cool. Reserve the chicken.
At this point, the soup just needs salt and peas. Simmer a couple minutes. That's the first course.
Papas Dulces and Fried Chicken with Salsa Amarilla
4 Chicken legs, from the pot, skinned
sweet potatoes (camote), from the pot, cooled
2 tomatoes
1 lime
for the salsa:
2 spicy yellow peppers
1/2 onion
2 cloves garlic
2 tablespoons milk or water
1/4 c peanuts or mild cheese
2 tablespoons olive oil
1 tablespoon huacatay or cilantro
2 bland crackers
salt to taste
Rough chop veggies and sautee in olive oil for 5 minutes. Blend wit the rest of ingredients in a blender or food processor. This sauce is spicy.
In a lightly oiled hot pan, brown the chicken and sprinkle with a bit of salt and pepper. Slice the cold sweet potato and tomato and layer on the plate. Douse in salsa* **. Serve with a lime wedge. Sweet, spicy, salty, caramelized, smooth, rich, fresh. One pot. Three courses. Fantastic.
*if you prefer a mild salsa, sweet yellow peppers are just as good.
**And if you can't find hot yellow, use hot green or hot red: equally delicious.
Subscribe to:
Posts (Atom)